Signal Flow
The signal flow article is an in-depth exploration of the path of audio signal through the mixing process. Understanding signal flow is key to achieving professional quality mixes. This article will walk you through each step of signal flow, highlighting the importance of each element and providing practical advice. Whether you’re a beginner or an experienced user, this article will help you master the key aspects of signal flow to improve your audio mixing skills.
Each article in the Mix and Tricks series is designed in such a way that the concepts covered are not detailed in the extreme, so that they can be understood by all. It is therefore quite possible that some information is missing or that some is presented in a simplified manner.
Introduction to Signal Flow in Audio Mixing
• Explanation of the concept of signal flow
In the world of audio mixing, “signal flow” is a key concept. It represents the audio signal path through the mixing process. Understanding signal flow is key to getting a quality mix. Signal flow in mixing refers to the order in which audio signals pass through the various processing stages. By understanding signal flow, you can effectively organize your tracks and optimize sound processing.

• Importance of good signal flow management for effective mixing
Decisions made in the signal flow can have a significant impact on the end result of your mix. Therefore, it is important to plan and structure your signal flow in a logical and consistent way. Organizing the signal flow also allows you to make precise and consistent adjustments throughout the mixing process.
Channel Strip Signal Flow
It’s crucial to have a deep understanding of how an analog channel strip’s signal flow works so you can replicate the same setup in your DAW (digital audio workstation). In this article, we mainly focus on the part of the signal flow related to the mixing phase, leaving aside aspects of the recording phase, such as phantom power (48V), pad and gain, which will be detailed in a future article dedicated to recording.
• Processing order: Pre Fader
In addressing the part of the signal flow that interests us, we start with the insert processing, in particular the compressor and the equalizer, which are placed at the top of the chain, in Pre Fader.
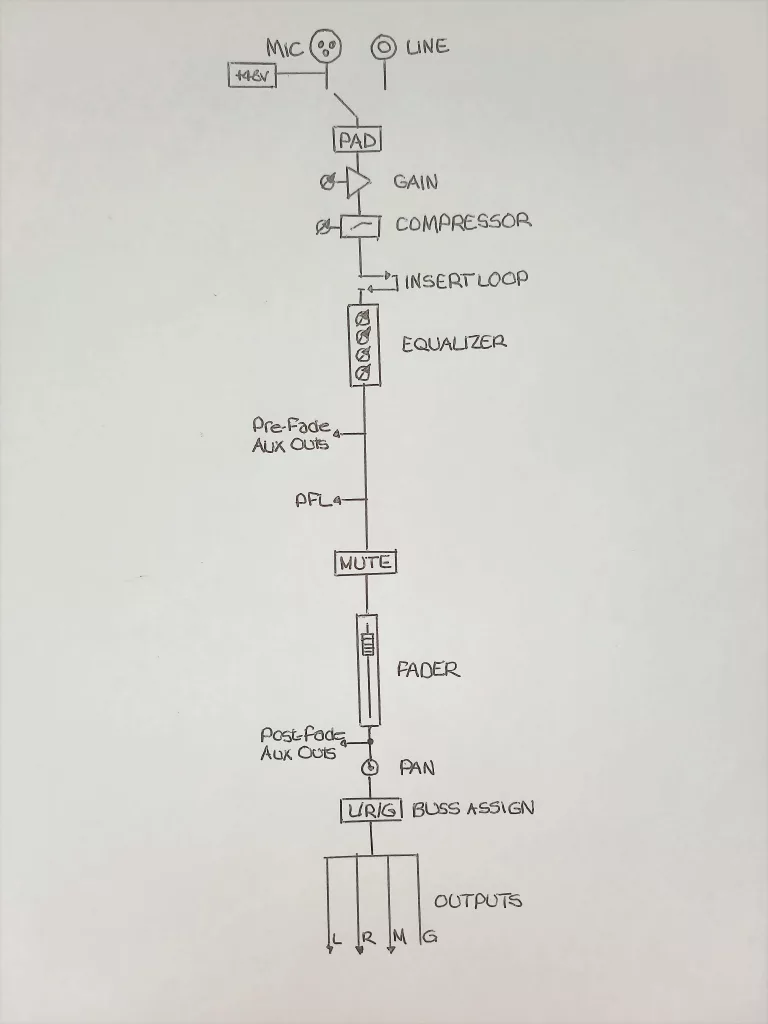
The terms “Pre Fader” and “Post Fader” are very important and it is essential to understand them. They indicate whether or not your processing depends on the position of the channel’s volume fader.
Insert treatments are specifically placed in Pre Fader so that the position of the fader has no impact on the level of the signal entering these treatments.
This is why it is recommended to work with the “solo in PFL” option activated on your DAW when setting up insert processing.
This lets you see the actual output level of inserts, independent of fader position.

Continuing our exploration of the signal flow, we come across the pre fader aux sends. These auxiliary sends serve different uses, one of which we will explain in the bonus part of this article. Then, we approach the famous PFL (Pre Fader Listen), which corresponds to the solo mode before the fader. It allows the signal to be heard before it is influenced by the volume fader setting and the like. At the end of the chain we find the mute followed by the volume fader.

• Processing order: Post Fader
Finally, we have the post fader aux sends. These aux sends are described in detail in the next part of the article, where we explore their specific usefulness. We also find the management of the panoramic used to place the signal in the stereo.

To conclude the analog signal flow, we discuss routing, which involves determining the output to which the signal from the slice will be routed.
Freesong analysis
FreeMastering Sample
Insert processing and timing effects
• Placement of frequency and dynamic processing in the processing chain
The location of dynamic and frequency processing is essential for mixing. These treatments directly modify the sound and are therefore placed in INSERT. Each treatment depends on the previous one. For example, an EQ followed by a compressor produces different results than the reverse. There is no strict order, it all depends on your creative intent.
• Placement of frequency and dynamic processing in the processing chain
Regarding the effects, it is important to understand how to integrate them into a signal flow similar to that of a professional studio.
The Post Fader Auxiliary Sends (SENDS) on the channel strips are used for various purposes. Here we will use it to send the signal to a multi-effects.
Let’s take the example of adding a chorus to a vocal track:
– Create an auxiliary track in your session and add the effect in question as an insert.
– The output of this auxiliary track will serve as an effect return, which you can route to a “master effect” track to group all the effects of the session.
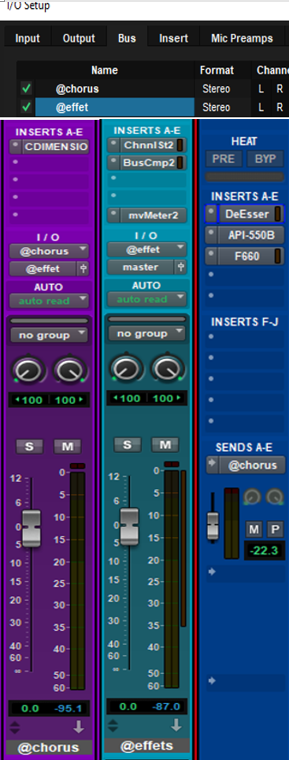
– Create a bus that you will name, for example, “@chorus”, to route the signal between the vocal tracks and the effect.
– Finally, assign the “@chorus” bus to the auxiliary track input as well as to the post fader auxiliary sends of the vocal tracks and adjust the send rate of these sends.
By following these steps, you will be able to effectively integrate effects such as reverb, delay, chorus, etc.
Upstream Signal Flow Configuration
• Organize tracks and channels in your mixing software
In your mixing software, the organization of tracks and channels plays a vital role. It is important to organize the tracks in a logical and consistent way to facilitate your workflow. By using groups, folders or colors, you can group similar tracks together. Plus, assigning clear names and distinct colors to tracks helps identify them quickly.
• Assignment of inputs/outputs and signal routing
Then, after arranging the tracks, it will be necessary to configure the I/Os and the buses to route the signal. Use a separate syntax for each part, for example: @effectbus, PHYSICAL INPUT and OUTPUT, virtual input and output, etc.
• Using subgroups and busses to group elements
Mix busses (virtual i/o) are also useful for grouping several tracks together and applying common processing to them. Using subgroups allows you to process multiple tracks together. Organized management also makes it easy to navigate and edit your mix project.

Other Bonus Signal Flow Configurations
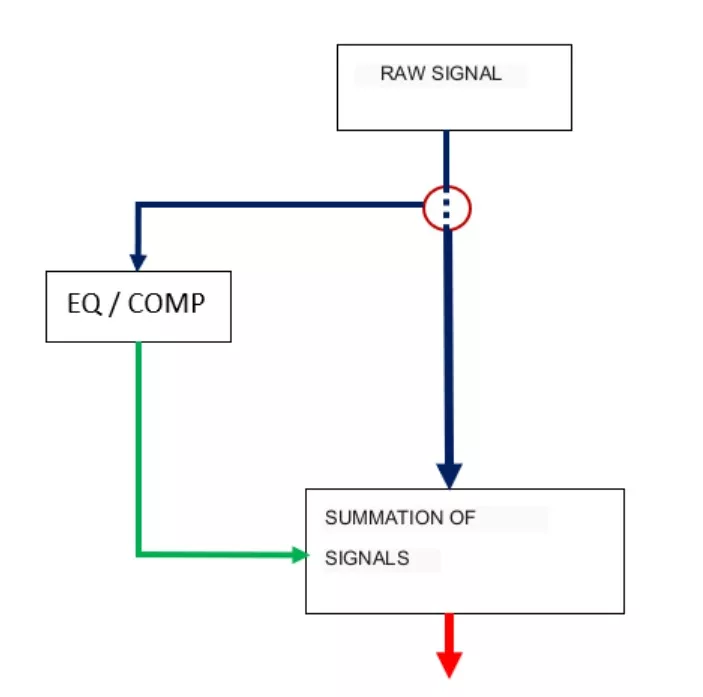
• Parallel Processing: Auxiliary Send Pre Fader
Earlier in the article, I mentioned the pre-fader aux sends present on the channel strip mimic. One of their uses is parallel signal processing.
Unlike aux sends to effects, which must be post-fader to depend on fader position, pre-fader sends allow the signal to be processed by other compression, EQ, etc.. processing in parallel with the treatments already applied.

Parallel processing is a technique commonly used in professional audio mixing. It consists of creating a copy of the original signal and processing it differently. This copy is then mixed with the original signal to add texture and presence. Parallel processing can be applied to different aspects of sound, such as compression, equalization and effects.
It keeps the original signal while adding color and/or power. To use this technique, create an auxiliary track where you will apply the desired treatments. Then adjust the level of the parallel processed signal to achieve the desired effect.
For example, a common use is to apply parallel processing using an EQ with precise settings on the snare drum to alter its final color. This allows the overall sound of the different Elements to be shaped more precisely.
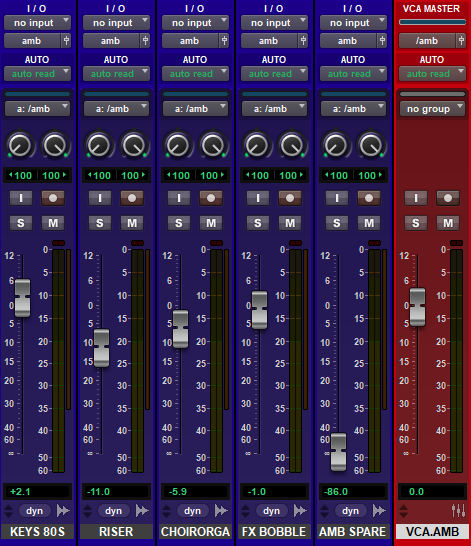
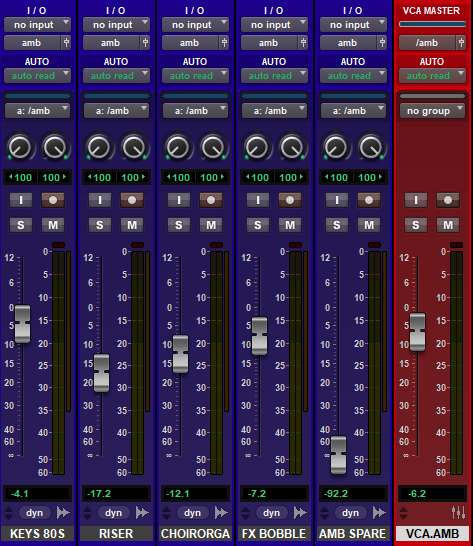
•VCA
VCAs (Voltage-Controlled Amplifiers) are invaluable tools in the audio mixing process. They make it possible to control and automate the level of several tracks simultaneously while maintaining the balance carried out. VCAs offer great flexibility and make it easier to manage the volume in a mix. They allow levels to be adjusted consistently and facilitate automations.
Conclusion
In conclusion, signal flow is a fundamental part of the audio mixing process. Understanding how the signal moves through the different stages is key to achieving professional quality mixes. By mastering signal flow, you’ll be able to make informed decisions about track layout, I/O assignment, processing placement, and more. Remember that every choice you make in the signal flow can have a significant impact on the end result. Keep exploring and experimenting to hone your signal flow skills to create exceptional mixes!