Loudness part 3: Practice
Welcome to this article dedicated to Loudness management. Loudness management is a crucial step in the music production process, particularly for streaming platforms, as each platform has its own Loudness standard. In this article, we will explore how to vary the Loudness of a track using various techniques, such as equalization, compression, and limiting. We will also discuss the importance of considering the musical identity of a production in the Loudness management process.
How to vary the Loudness? The importance of measurement tools
Sound engineers need measurement tools for sound level management. Whether in analog or digital, during recording or mixing, good level management is essential for quality sound processing. Measurement tools provide an accurate view of the different levels, which ensures good level management from the very first stage of any sound processing.
The VU meter or Volume Unite Meter
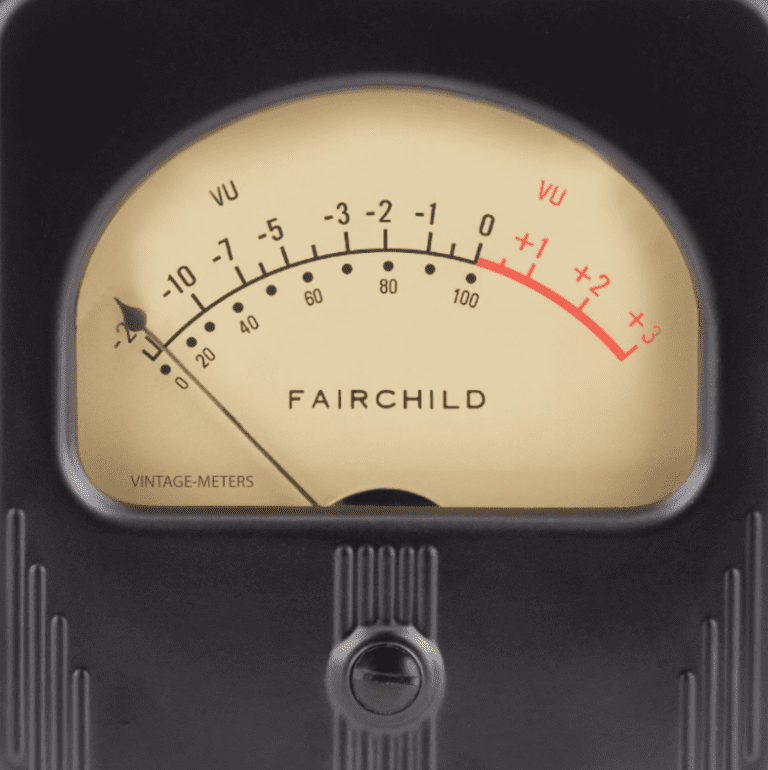
Invented and standardized in 1939 in the United States, the VU meter is now an essential equipment in all studios. Technically, it allows visualizing the average level of the sound signal by behaving like a ballistic voltmeter. The needle of the VU meter takes about 300ms to rise from the introduction of the signal, and the same for descending once the signal is finished. However, due to its reaction time, the VU meter can only display the average level and not the Peak level.
The measurement scale of the VU meter is graduated in VU Unit and/or percentage, where 0 VU or 100% indicates the maximum level before saturation or degradation of the sound signal.
The PPM or Program Peak Meter

Developed for the first time in 1930, and improved and standardized over the years, the PPM has a different ballistic time than the VU meter with a rise time of 10ms and an exaggeratedly slow decay time to allow for good visualization of Peak levels. Unlike the VU meter, it has an asymmetrical ballistic.
The PPM is available with different scale standards. The DIN scale is graduated from -50 to +5 dB. The NORDIC scale has a range of -36 to +9 dBu (sometimes -42 to +12 dBu). Finally, the BBC scale has a range of 0 to 7, where 4, located in the middle of the scale, corresponds to 0 dBu.
The PPM is a more precise measuring tool for Peak levels, offering better visualization of the dynamics of the sound signal.
The Digital Meter
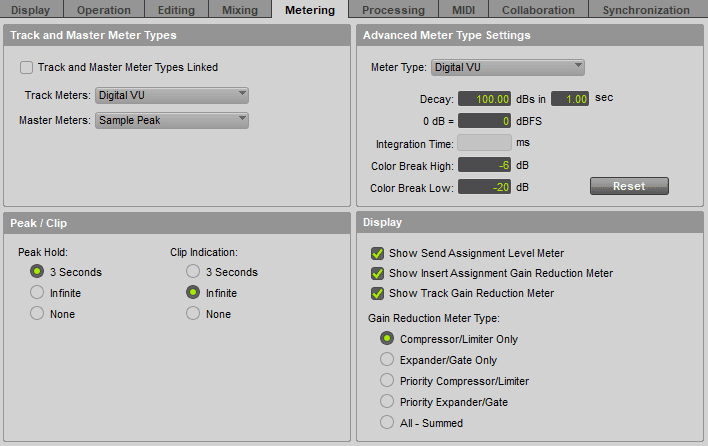
Digital meters provide better control over sound levels by recording and displaying numerical data as visual information for better understanding. Unlike analog meters, digital systems do not have headroom above the maximum quantization level. Therefore, a theoretical margin must be created by choosing a “zero” point well below the maximum level. Digital meters are scaled so that the maximum quantization level is marked as 0dBFS (full scale), and so that the alignment level always has a negative value below this point. Additionally, the ballistic characteristics of digital meters can be modified to offer greater flexibility.

The Loudness Meter
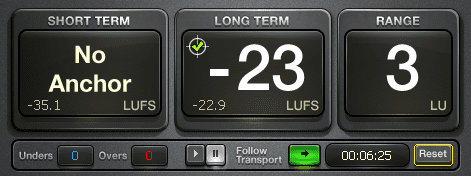
It is important to understand the different values displayed by the plugin. The Short Term indicates the average sound level over a period of 3 seconds, while the Long Term represents the average sound level over the entire song. The Range, on the other hand, corresponds to the difference between the maximum and minimum sound level over a period of 3 seconds.
To properly adjust the Loudness Meter plugin, it is recommended to refer to the standards in force for the platform or broadcasting support targeted.

Generally, the target loudness level values are indicated in LUFS (Loudness Units Full Scale).
It is also important to note that the choice of values for Short Max/Min True Peak and the target level for Long Term depends on the dynamics of the music or audio production. Therefore, it is essential to make customized settings based on the content.
In conclusion, measuring tools such as VU meters, PPMs, and digital meters are essential for audio professionals to measure and control sound levels. Each tool has its advantages and disadvantages in terms of accuracy and ballistic. However, with the evolution of technology, digital audio workstations have introduced new digital measurement tools, such as Loudness plugins, which allow for accurate sound level measurement and compliance with Loudness standards.
How to vary the Loudness? Presentation of practical tools
In this section, I will provide a concise overview of the practical tools required to ensure effective Loudness management.
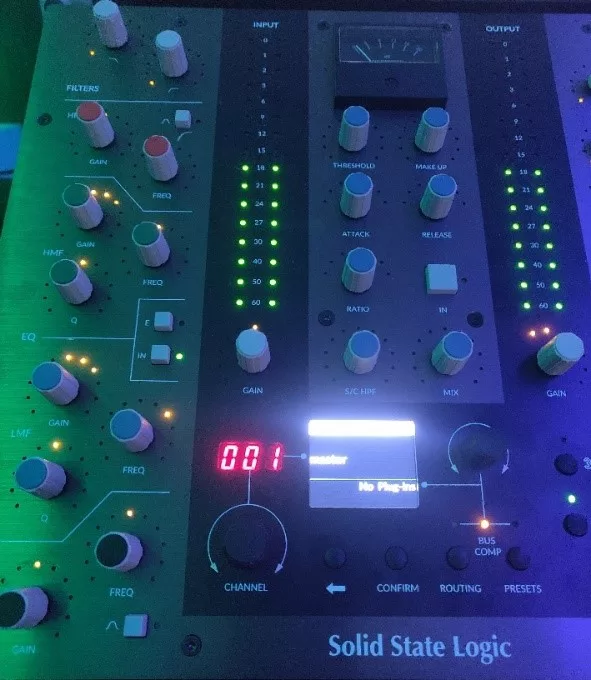
The compressor
The main settings of a compressor include the ratio, attack, release, knee, threshold, and input/output gain. All of these settings contribute to defining how the compressor affects the signal. The bypass buttons/functions are also essential for making A/B comparisons and evaluating the applied processing.
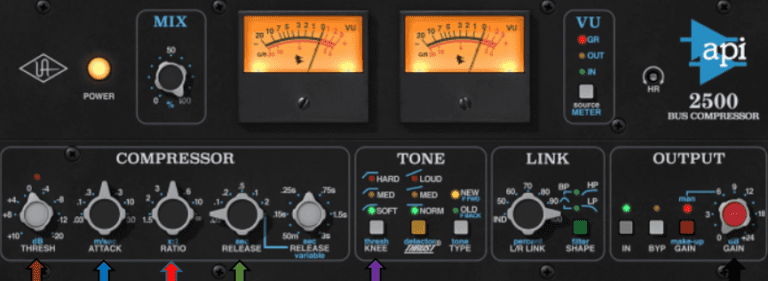
- The Ratio defines the compression ratio.
- The Attack defines the time before the compressor starts to act.
- The Release defines the release time.
- The Knee defines how the compressor will begin to compress.
- The Threshold defines the level at which the compressor will begin to act.
- The Output Gain controls the overall output level of the device after processing.

This image clearly shows the operation of a compressor.
The threshold is set to -10dB and we can observe the behavior of compression with different ratios.
A limiter is a tool similar to a compressor, with one main difference: it has an extremely high compression ratio (100:1). This means that the peaks of the signal are automatically reduced as soon as they reach the threshold and cannot exceed this threshold.
Further information
These tools allow crushing the sound attacks to bring up the rest of the envelope. This has the effect of increasing the perceived average level. The limiter is set to vary the True Peak, which corresponds to the highest level peak of the overall signal. By compressing the peaks, the limiter can also increase the value of “Short Term”, which raises the overall Loudness level. The use of a multi-band equalizer can also contribute to improving Loudness by varying the frequency bands, especially the mids (Fletcher curve), and thus influencing the value of “Short Term“.
Testing different settings for a master dedicated to the image
In the following of this article, I will show you how to directly adjust the LUFS level of a mix. The goal is to comply with the audiovisual standards of the EBU in terms of loudness. Below is the spectrum of the mix that has been used.


Here are the analyses of the untreated master:
With the aim of meeting the EBU audiovisual loudness standard, which recommends a level of -23LUFS, it is important to check the level of the mix. However, it is common for the baseline level of the mix to be too high or too low to work with. In this case, the first step is to simply reduce the level to achieve an acceptable working level.

Ultimately, by reducing the overall level of the mix, a margin of work is left. However, the mix is currently at -26 LUFS, which is still below the target level. To fine-tune the result, the tools seen previously will be used to reach the target.
How to vary the Loudness?
Implementation
Using an equalizer
Improving Loudness using the EQ: increasing the Hi and Low mids by 5dB and adjusting the output level to avoid any alteration of the analysis.
I was able to observe an increase of 1 LUFS (from -25.7 to -24.6) without increasing the overall output level. This demonstrates the impact of the mids on Loudness, in accordance with the theory of Fletcher.
This test is purely practical and therefore does not take into account the artistic aspect of this project.
Use of a limiter
I used a limiter to compress the peak levels of the music and increase the Loudness. I adjusted the Threshold and maintained a consistent output level with the uncompressed audio.
However, it is important to note that this experiment was conducted for purely technical purposes. This test did not take into account the impact on the sound quality of the music.

Here is what the spectrum of the compressed signal looks like, shown in green. We can see that the attacks of the signal have all been cut off and that the rest of the signal has been raised.
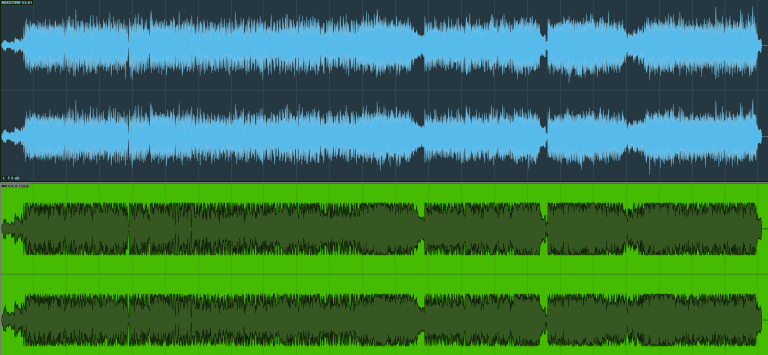
This additional processing resulted in further increasing our LUFS, which reached its target (-23 LUFS) in this case.
Loudness management for music on streaming platforms
In our previous article, we addressed the issue of Loudness for music intended for streaming platforms. We saw that each platform has its own Loudness standard. How can we vary Loudness to achieve a good level of perceived volume and be valid on the majority of platforms? It is essential to understand how these platforms handle your master if it does not comply with the imposed standards.

The music industry often faces the recurring question of what Lufs level to target for mastering music for streaming platforms. Unfortunately, there is no single answer to this question. To get closer to the correct Loudness level, it is always necessary to work in comparison with reference tracks. Each platform has its own standard in terms of Loudness, and when it receives a master, the algorithm will either reduce the gain of the track if the master is too loud, or increase the Lufs level via the same process as a limiter if the master is too quiet.
Conclusion
This article aimed to address the question: How to vary Loudness?
In conclusion, to achieve an optimal Loudness level during mastering, it is essential to consider the musical identity of your production. Indeed, the Loudness level will not be worked in the same way for a classical music piece and an electronic music piece because their internal characteristics are different. For example, an electronic music piece often requires a lot of well-executed compression for an optimal feeling of the bass, whereas a classical music piece must retain the proper dynamics of its instruments.
Both pieces will have the same LUFS level on the platforms but with characteristics that are specific to them in terms of Loudness, depending on their respective musical identities.